uboot fastboot原理

本文介绍了fastboot协议,在uboot中如何配置支持fastboot,uboot中fastboot的实现流程以及fastboot命令如何使用。

fastboot简介

1、fastboot协议是一种通过USB或以太网与引导加载程序通信的机制。 它的设计非常简单,可以在各种设备和运行Linux,macOS或Windows的主机上使用。主要是PC机通过fastboot协议与bootloader通信。
我们可以理解在uboot中运行fastboot的为客户端,在PC端(ubuntu)运行fastboot的为服务器端,两者之间的通信走fastboot协议。
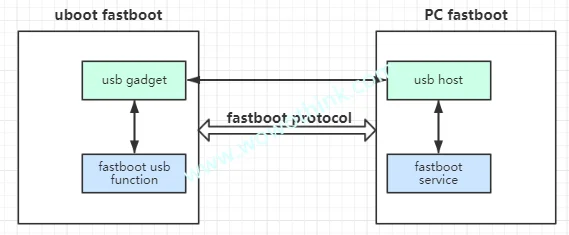
fastboot协议

2、fastboot协议最基本的要求:

  • 2个bulk端点(BULK IN/OUT),可以通过USB枚举信息看到详细的信息:
查看usb设备
1
2
3
4
5
6
7
8
9
10
11
12
13
14
15
16
17
18
19
20
21
22
23
24
25
26
27
28
29
30
31
32
33
34
35
36
37
38
39
40
41
42
43
44
45
46
47
48
49
50
51
52
53
54
55
56
57
58
59
60
61
62
63
64
65
66
67
68
69
victor@victor-HP:~ lsusb -d 0525:a4a5 -v

Bus 001 Device 006: ID 0525:a4a5 Netchip Technology, Inc. Pocketbook Pro 903
Device Descriptor:
bLength 18
bDescriptorType 1
bcdUSB 2.00
bDeviceClass 0 (Defined at Interface level)
bDeviceSubClass 0
bDeviceProtocol 0
bMaxPacketSize0 64
idVendor 0x0525 Netchip Technology, Inc.
idProduct 0xa4a5 Pocketbook Pro 903
bcdDevice 2.21
iManufacturer 1 FSL
iProduct 2 USB download gadget
iSerial 3 0d123198538fcadc
bNumConfigurations 1
Configuration Descriptor:
bLength 9
bDescriptorType 2
wTotalLength 32
bNumInterfaces 1
bConfigurationValue 1
iConfiguration 2 USB download gadget
bmAttributes 0xc0
Self Powered
MaxPower 2mA
Interface Descriptor:
bLength 9
bDescriptorType 4
bInterfaceNumber 0
bAlternateSetting 0
bNumEndpoints 2
bInterfaceClass 255 Vendor Specific Class
bInterfaceSubClass 66
bInterfaceProtocol 3
iInterface 4 Android Fastboot
Endpoint Descriptor:
bLength 7
bDescriptorType 5
bEndpointAddress 0x81 EP 1 IN
bmAttributes 2
Transfer Type Bulk
Synch Type None
Usage Type Data
wMaxPacketSize 0x0200 1x 512 bytes
bInterval 0
Endpoint Descriptor:
bLength 7
bDescriptorType 5
bEndpointAddress 0x02 EP 2 OUT
bmAttributes 2
Transfer Type Bulk
Synch Type None
Usage Type Data
wMaxPacketSize 0x0200 1x 512 bytes
bInterval 0
Device Qualifier (for other device speed):
bLength 10
bDescriptorType 6
bcdUSB 2.00
bDeviceClass 0 (Defined at Interface level)
bDeviceSubClass 0
bDeviceProtocol 0
bMaxPacketSize0 64
bNumConfigurations 1
Device Status: 0x0001
Self Powered
  • USB full-speed最大包为64Bytes,high-speed最大包为512Bytes;
  • 该协议完全由主机驱动和同步(与多通道,双向,异步ADB协议不同)。

uboot配置fastboot协议

关于fastboot相关宏的解释,可以参考cmd/fastboot/Kconfig文件。下面说一下在uboot中配置支持fastboot。
1、uboot中已实现对fastboot协议的支持:

  • drivers/usb/gadget/fastboot.c:fastboot usb function源码;
  • doc/README.android-fastboot:fastboot使能说明文档;
  • doc/README.android-fastboot-protocol:fastboot协议说明文档;

2、uboot中要使能fastboot,需要在板级配置打开以下的宏:

使能fastboot
1
2
3
4
CONFIG_FASTBOOT
CONFIG_USB_FUNCTION_FASTBOOT
CONFIG_CMD_FASTBOOT
CONFIG_ANDROID_BOOT_IMAGE

uboot在命令行中可以通过fastboot命令进入fastboot模式。

3、使能fastboot usb gadget
因为fastboot协议是基于usb gadget,所以需要打开或配置以下几个宏:

配置usb gadget
1
2
3
4
CONFIG_USB_GADGET_DOWNLOAD
CONFIG_USB_GADGET_VENDOR_NUM
CONFIG_USB_GADGET_PRODUCT_NUM
CONFIG_USB_GADGET_MANUFACTURER

这里面指定的VIDPID必须要在fastboot client中能找到,如果没有,也可以用ubuntu fastboot命令的以下选项指定设备。

fastboot命令指定特定的设备
1
2
3
4
-s <specific device>                     specify device serial number
or path to device port
-i <vendor id> specify a custom USB vendor id
-p <product> specify product name

4、配置缓冲区地址和大小
fastboot需要一块大的内存区域用来下载,需要配置CONFIG_FASTBOOT_BUF_ADDR缓冲区的起始地址以及CONFIG_FASTBOOT_BUF_SIZE大小,这两个值决定了你可以通过fastboot烧写多大的镜像。

配置缓冲区地址和大小
1
2
CONFIG_FASTBOOT_BUF_ADDR=0x82800000
CONFIG_FASTBOOT_BUF_SIZE=0x40000000

5、配置fastboot flash命令的支持
如果想要通过fastboot flash命令烧写到flash上,必须打开CONFIG_FASTBOOT_FLASH相关的配置。比如我板子上使用的是eMMC,必须使能如下的宏:

配置支持flash
1
2
3
CONFIG_FASTBOOT_FLASH=y
CONFIG_FASTBOOT_FLASH_MMC=y
CONFIG_FASTBOOT_FLASH_MMC_DEV=0


uboot中fastboot的实现流程

imx8 uuu基于fastboot协议进行镜像的烧写,以下的分析基于NXP提供的4.14.98_ga版本。

uboot中fastboot命令

cmd/fastboot.c
1
2
3
4
5
6
7
8
9
10
11
12
13
14
15
16
17
18
19
20
21
22
23
24
25
26
27
28
29
30
31
32
33
34
35
36
37
38
39
40
41
42
43
44
45
46
47
48
49
50
static int do_fastboot(cmd_tbl_t *cmdtp, int flag, int argc, char *const argv[])
{
int controller_index;
char *usb_controller;
int ret;

if (argc < 2)
return CMD_RET_USAGE;

usb_controller = argv[1];
controller_index = simple_strtoul(usb_controller, NULL, 0);
#ifdef CONFIG_FASTBOOT_USB_DEV
controller_index = CONFIG_FASTBOOT_USB_DEV;
#endif

ret = board_usb_init(controller_index, USB_INIT_DEVICE);
if (ret) {
pr_err("USB init failed: %d", ret);
return CMD_RET_FAILURE;
}

g_dnl_clear_detach();
ret = g_dnl_register("usb_dnl_fastboot");
if (ret)
return ret;

if (!g_dnl_board_usb_cable_connected()) {
puts("\rUSB cable not detected.\n" \
"Command exit.\n");
ret = CMD_RET_FAILURE;
goto exit;
}

while (1) {
if (g_dnl_detach())
break;
if (ctrlc())
break;
usb_gadget_handle_interrupts(controller_index);
}

ret = CMD_RET_SUCCESS;

exit:
g_dnl_unregister();
g_dnl_clear_detach();
board_usb_cleanup(controller_index, USB_INIT_DEVICE);

return ret;
}

1、首先在uboot命令行执行fastboot x,指定第x个usb controller,使用这个controller进行通信,如果没有,默认使用CONFIG_FASTBOOT_USB_DEV指定的usb controller;
2、然后调用board_usb_init()函数做usb device controller的初始化,这个函数在board/freescale/imx8qxp_mek.c中定义。在NXP的BSP中,这个函数如果没有打开CONFIG_USB_CDNS3_GADGET的话就是个空函数。
为什么呢?我的理解是NXP使用imx uuu是使用usb0(chipidea)做为下载口,当将板子设置为SDP模式,rom code就会去初始化usb0 controller,并且配置为hid设备。因此,如果在SDP模式下,usb0 controller就无需初始化了。
3、调用g_dnl_register()函数注册一个名为usb_dnl_fastbootusb复合设备

drivers/usb/gadget/g_dnl.c
1
2
3
4
5
6
7
8
9
10
11
12
13
14
15
16
17
18
19
/*      
* NOTICE:
* Registering via USB function name won't be necessary after rewriting
* g_dnl to support multiple USB functions.
*/
int g_dnl_register(const char *name)
{
int ret;

debug("%s: g_dnl_driver.name = %s\n", __func__, name);
g_dnl_driver.name = name;

ret = usb_composite_register(&g_dnl_driver);
if (ret) {
printf("%s: failed!, error: %d\n", __func__, ret);
return ret;
}
return 0;
}

  • 在这个文件中配置了设备描述符等信息以及绑定function。
  • uboot中的这一套usb composite framework与kernel的一样,后续将会出一个关于这个框架的文章。可以看看我之前的文章Androidadb驱动实现原理 关于usb复合设备的注册是大同小异的。
  • 在这个复合设备中,会依次查找绑定的usb function。在drivers/usb/gadget/f_fastboot.c中调用了DECLARE_GADGET_BIND_CALLBACK(usb_dnl_fastboot, fastboot_add);这就将fastboot的usb function与g_dnl的usb composite device绑定起来了。
drivers/usb/gadget/g_dnl.c
1
2
3
4
5
6
7
8
9
10
11
12
13
static int g_dnl_do_config(struct usb_configuration *c)
{
const char *s = c->cdev->driver->name;
struct g_dnl_bind_callback *callback = g_dnl_bind_callback_first();

debug("%s: configuration: 0x%p composite dev: 0x%p\n",
__func__, c, c->cdev);

for (; callback != g_dnl_bind_callback_end(); callback++)
if (!strcmp(s, callback->usb_function_name))
return callback->fptr(c);
return -ENODEV;
}
include/g_dnl.h
1
2
3
4
5
6
7
8
9
10
11
/*  
* @usb_fname: unescaped USB function name
* @callback_ptr: bind callback, one per function name
*/
#define DECLARE_GADGET_BIND_CALLBACK(usb_fname, callback_ptr) \
ll_entry_declare(struct g_dnl_bind_callback, \
__usb_function_name_##usb_fname, \
g_dnl_bind_callbacks) = { \
.usb_function_name = #usb_fname, \
.fptr = callback_ptr \
}

4、在这之后就进入while(1)的循环,如果碰到g_dnl驱动卸载掉或者ctrl + c就跳出,否则调用usb_gadget_handle_interrupts()处理usb中断(我这里使用到的是chipidea udc)。至此,当你在uboot命令行执行fastboot 1后,接下来全部都是在处理usb ep的中断,也就是处理PC端发送过来的指令。

drivers/usb/gadget/ci_udc.c
1
2
3
4
5
6
7
8
9
10
int usb_gadget_handle_interrupts(int index)
{
u32 value;
struct ci_udc *udc = (struct ci_udc *)controller.ctrl->hcor;
value = readl(&udc->usbsts);
if (value)
udc_irq();

return value;
}

更一般的,这里指就是usb endpoint的中断。具体的,就是处理fastbootusb function中指定的usb endpoint的中断。其中rx_handler_command()函数用来处理PC端发送过来的数据,fastboot_complete()用来处理板子发送给PC端的数据。

drivers/usb/gadget/f_fastboot.c
1
2
3
4
5
6
7
8
9
10
11
12
13
14
15
16
17
18
19
20
21
22
23
24
25
26
27
28
29
static int fastboot_set_alt(struct usb_function *f,
unsigned interface, unsigned alt)
{
......
f_fb->out_req = fastboot_start_ep(f_fb->out_ep);
if (!f_fb->out_req) {
puts("failed to alloc out req\n");
ret = -EINVAL;
goto err;
}
f_fb->out_req->complete = rx_handler_command;

d = fb_ep_desc(gadget, &fs_ep_in, &hs_ep_in, &ss_ep_in);
ret = usb_ep_enable(f_fb->in_ep, d);
if (ret) {
puts("failed to enable in ep\n");
goto err;
}

f_fb->in_req = fastboot_start_ep(f_fb->in_ep);
if (!f_fb->in_req) {
puts("failed alloc req in\n");
ret = -EINVAL;
goto err;
}

f_fb->in_req->complete = fastboot_complete;
......
}


fastboot支持的参数

在前面,我们说到rx_handler_command()函数用来处理PC端发送过来的数据,其中cmd_dispatch_info[]数组定义了一系列fastboot所支持的参数列表以及对应的处理函数。

drivers/usb/gadget/f_fastboot.c
1
2
3
4
5
6
7
8
9
10
11
12
13
14
15
16
17
18
19
20
21
22
23
24
25
26
static const struct cmd_dispatch_info cmd_dispatch_info[] = {
#ifdef CONFIG_FSL_FASTBOOT
{
.cmd = "reboot-bootloader",
.cb = cb_reboot_bootloader,
},
{
.cmd = "upload",
.cb = cb_upload,
},
{
.cmd = "get_staged",
.cb = cb_upload,
},
#ifdef CONFIG_FASTBOOT_LOCK
{
.cmd = "flashing",
.cb = cb_flashing,
},
{
.cmd = "oem",
.cb = cb_flashing,
},
#endif
......
}


fastboot环境变量配置

前面我们说过,需要配置CONFIG_FASTBOOT_BUF_ADDR缓冲区的起始地址以及CONFIG_FASTBOOT_BUF_SIZE大小,这个其实是为了配置一个名为fastboot_buffer的环境变量。

drivers/usb/gadget/f_fastboot.c
1
2
3
4
5
6
7
8
static void parameters_setup(void)
{
interface.nand_block_size = 0;
interface.transfer_buffer =
(unsigned char *)env_get_ulong("fastboot_buffer", 16, CONFIG_FASTBOOT_BUF_ADDR);
interface.transfer_buffer_size =
CONFIG_FASTBOOT_BUF_SIZE;
}


uuu进入fastboot模式

CONFIG_MFG_ENV_SETTINGS_DEFAULT中会执行fastboot 0进入fastboot下载模式,等待与PC之间的通信。

include/configs/imx_env.h
1
2
3
4
5
6
7
8
9
10
11
12
13
14
15
16
17
18
#define CONFIG_MFG_ENV_SETTINGS_DEFAULT \
"mfgtool_args=setenv bootargs console=${console},${baudrate} " \
"rdinit=/linuxrc " \
"clk_ignore_unused "\
"\0" \
"kboot="MFG_BOOT_CMD"\0"\
"bootcmd_mfg=run mfgtool_args;" \
"if iminfo ${initrd_addr}; then " \
"if test ${tee} = yes; then " \
"bootm ${tee_addr} ${initrd_addr} ${fdt_addr}; " \
"else " \
MFG_BOOT_CMD "${loadaddr} ${initrd_addr} ${fdt_addr}; " \
"fi; " \
"else " \
"echo \"Run fastboot ...\"; fastboot 0; " \
"fi;\0" \

#endif

各个宏之间的关系如下:

宏之间的关系
1
2
3
4
5
6
7
8
include/env_default.h
CONFIG_EXTRA_ENV_SETTINGS

include/configs/imx8qxp_mek.h
CONFIG_MFG_ENV_SETTINGS

include/configs/imx_env.h
CONFIG_MFG_ENV_SETTINGS_DEFAULT


ubuntu下载fastboot工具

前面在uboot中配置支持fastboot,接下来要在PC端下载fastboot工具,ubuntu使用如下命令下载。这之后就可以在PC端使用fastboot命令与uboot通信并且执行相关的操作了。

ubuntu下载fastboot
1
sudo apt-get install android-tools-fastboot

查看fastboot命令的使用:

fastboot help
1
2
3
4
5
6
7
8
9
10
11
12
13
14
15
16
17
18
19
20
21
22
23
24
25
26
27
28
29
30
31
32
33
34
35
36
37
38
usage: fastboot [ <option> ] <command>

commands:
update <filename> reflash device from update.zip
flashall flash boot, system, vendor and if found,
recovery
flash <partition> [ <filename> ] write a file to a flash partition
erase <partition> erase a flash partition
format[:[<fs type>][:[<size>]] <partition> format a flash partition.
Can override the fs type and/or
size the bootloader reports.
getvar <variable> display a bootloader variable
boot <kernel> [ <ramdisk> [ <second> ] ] download and boot kernel
flash:raw boot <kernel> [ <ramdisk> [ <second> ] ] create bootimage and
flash it
devices list all connected devices
continue continue with autoboot
reboot reboot device normally
reboot-bootloader reboot device into bootloader
help show this help message

options:
-w erase userdata and cache (and format
if supported by partition type)
-u do not first erase partition before
formatting
-s <specific device> specify device serial number
or path to device port
-l with "devices", lists device paths
-p <product> specify product name
-c <cmdline> override kernel commandline
-i <vendor id> specify a custom USB vendor id
-b <base_addr> specify a custom kernel base address.
default: 0x10000000
-n <page size> specify the nand page size.
default: 2048
-S <size>[K|M|G] automatically sparse files greater
than size. 0 to disable


adb与fastboot的区别

Android设备和PC之间的协议通信,除了fastboot协议还有使用adb协议。

  • adb用于Android设备系统起来后的调试,允许访问Android系统。
  • fastboot用于Android设备开发过程中刷写镜像使用以及Android设备起不来进入fastboot模式救砖使用,对于线刷来说(Android设备与PC机通过USB线连接)。
  • 两个协议都是将Android设备配置为USB Gadget,PC做为USB Host,通过USB进行通信,只是一个走的是adb协议,一个走的是fastboot协议,两者之间的角色定位不同。

参考资料

1.fastboot官方文档
2.u-boot/doc/README.android-fastboot
3.samsung uboot fastboot command
4.与fastboot相关的知识

Title:uboot fastboot原理

Author:Victor Huang

Time:2019-06-22 / 21:06

Link:http://wowothink.com/5ade33b8/

License: Attribution-NonCommercial-NoDerivatives 4.0 International (CC BY-NC-ND 4.0)